
Hi, I'm Eric.
I’m an avid world traveler, photographer, software developer, and digital storyteller.
I help implement the Content Authenticity Initiative at Adobe.
Hi, I'm Eric.
I’m an avid world traveler, photographer, software developer, and digital storyteller.
I help implement the Content Authenticity Initiative at Adobe.
4 August 2008
Last year, on the Lightroom Journal, I wrote about using worklist keywords (2022 Update: This article is no longer available) to keep track of your keywording efforts. In this article, I look at some new and improved ways to accomplish the same thing with Lightroom 2.0.
I use worklists to keep track of work I want to do on my photography collection. It’s well suited for tasks that I do incrementally — a bit at a time, rather than all at once. Examples include:
In last year’s article, I described how to do this by using specially-named keywords and some tricks in the Find panel. With Lightroom 2.0, smart collections make this process easier and more logical.
I’ll use the same example I used before: I want to keep track of keywording status for a certain subset of my keywording tree: the people I know. In other words, I want to be able to ask these questions and get accurate answers:
I used to use keywords for this because they were easier to assign than collections, but with Lightroom 2, it makes more sense (to me, anyway) to use collections. Here’s why:
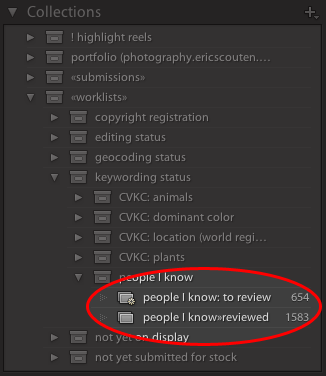
The screen shot above shows the Collections panel with my worklist keywords highlighted.
There’s a collection here that matches each of the questions I asked earlier:
The collection titled “people I know»reviewed” answers the question: “Which photos have I already keyworded.” I add each photo to this collection as I do the work of keywording for people I know. When I achieve my goal of having reviewed every photo in my library for people I know, every photo in my catalog will be a member of this collection.
The smart collection above it, titled “people I know: to review,” answers the inverse question: “Which photos have I not yet keyworded.” We’ll get to how it’s built in a moment, but it’s basically constructed as the inverse of the first collection. When I achieve my goal of having reviewed every photo in my library for people I know, this collection will be empty.
Now that I’ve explained what I’m trying to accomplish, here’s how I do it:
Step 1: Create the collection set that will contain this worklist. Click on the plus-arrow at the top-right of the Collections panel and choose Create Collection Set…. Give the set a descriptive name. If you want to place this set inside another set (as I’ve done, placing it inside my “keywording status” collection set), you can do this here.
Step 2: Create the collection that will represent your completed work. First, click on the collection set to make sure that it’s highlighted. Then click on the plus-arrow and choose Create Collection…. Choose a name for this collection. Make sure the Set popup still points to the desired collection set, and make sure the “Include selected photos” checkbox is turned off.
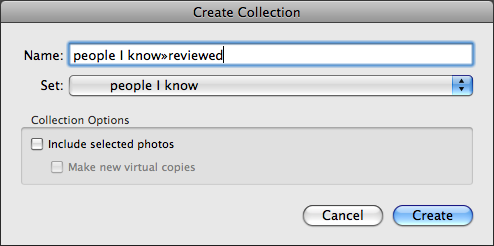
Important: The name of this collection must include a single word that does not appear in the name of any other collection you have. I recommend including some special character or symbol that’s not otherwise likely to appear instead of a space. You’ll see why in a moment when we build the smart collection. This is why my collection has the slightly unusual name “people I know»reviewed.” The word “know»reviewed” is what I’ll be searching for. (Mac users: You can type the » character — on an English keyboard at least — by typing Option-Shift-backslash. Windows users: I recommend using something simpler like ~.)
Step 3: Create the smart collection that will represent your to-do list. Make sure the collection set is still highlighted. Then click the plus-arrow and choose Create Smart Collection…. Again, make sure the Set popup points to the desired parent collection set. Then configure the collection as shown below:
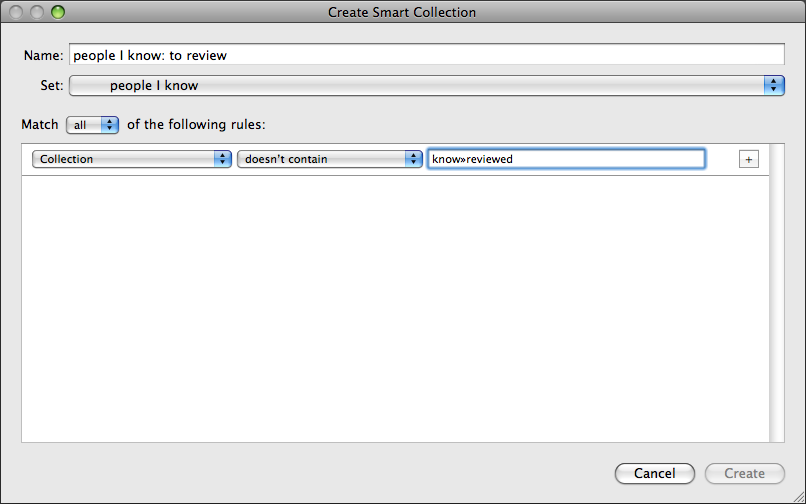
Hrm. That screenshot is a little scrunched. The popups read, in order: “Collection” “doesn’t contain” “know»reviewed”. The important part is that the text field contains the same single word you chose above in step 2 — and nothing more. If you enter multiple words separated by spaces, it will look for all of those words separately, which is not what you want.
That’s it! You should now have the same arrangement in your Collections panel that I highlighted in the first screen shot above. Your “reviewed” collection should have zero photos in it, and your “to review” smart collection should have the same number of photos as the “All Photographs” entry in the Catalog panel.
So … we’ve got keywording to do! Let’s get to it!
When I’m ready to do some keywording, I lay just a little bit of groundwork first:
Step 1: Right-click on the “reviewed” collection and choose Set as Target Collection. You should see a + appear after the collection’s name. This means that the B key will add or remove a photo from this collection.
Step 2: Click on the “to review” smart collection.
Simple, eh? The photos in your library grid are the photos that you haven’t reviewed yet.
You select individual photos or groups of related photos. Assign the relevant keywords to them. (Notice that the photos remain in view at this point. This is a good thing — you might have to assign several keywords. You wouldn’t want the photo to disappear after the first keyword, right?) When you’re sure you have the right keywords assigned to the selected photo(s), press the B key.
The selected photos disappear immediately from view. Handy, huh?
Even if no keyword in this list applies (i.e. there’s nobody you know in a particular photo), press the B key anyway. This just means that you’ve reviewed the photo and you’re sure that it’s correctly keyworded for people you know.
Turns out you can whittle through a worklist pretty quickly this way. The things I really like about this technique are:
I use a variation on this technique to sort photos into two distinct bins for my editing decision workflow.
Background: I don’t particularly care to sort through the dozens or even hundreds of variations on a particular theme that I might shoot on a particularly trigger-happy day. But I also don’t want to permanently delete them. So instead I create “archive” catalogs where I park the second-tier photos in case I need them someday. (In practice, that means I never really look at them again, but that’s another story…)
So every one of the photos in my main catalog is sorted into two bins, plus a “not yet decided” pile:
The “keep” pile is a standard collection, just like I described earlier.
The “archive” pile is a keyword with a special name. I decided to use keywords here for a couple of reasons:
The “to do” list is only slightly more complicated than in the first case I described earlier. I create two conditions. (Click on the + to the right of the first condition to add another row.) They are:
Then I just move through the to-do list, typing B for those photos I want to keep and Shift-K for those I want to archive out.
When I’m done with my edits, I select all the photos with the “edit»move to archive” keyword, export them as an independent catalog (File > Export as Catalog…), and delete them from the main catalog.
Thank you for reading. I hope you’ve enjoyed this article and that it helps you be more efficient and productive in Lightroom.

Subscribe to my free and occasional (never more than weekly) e-mail newsletter with my latest travel and other stories:
Or follow me on one or more of the socials: